

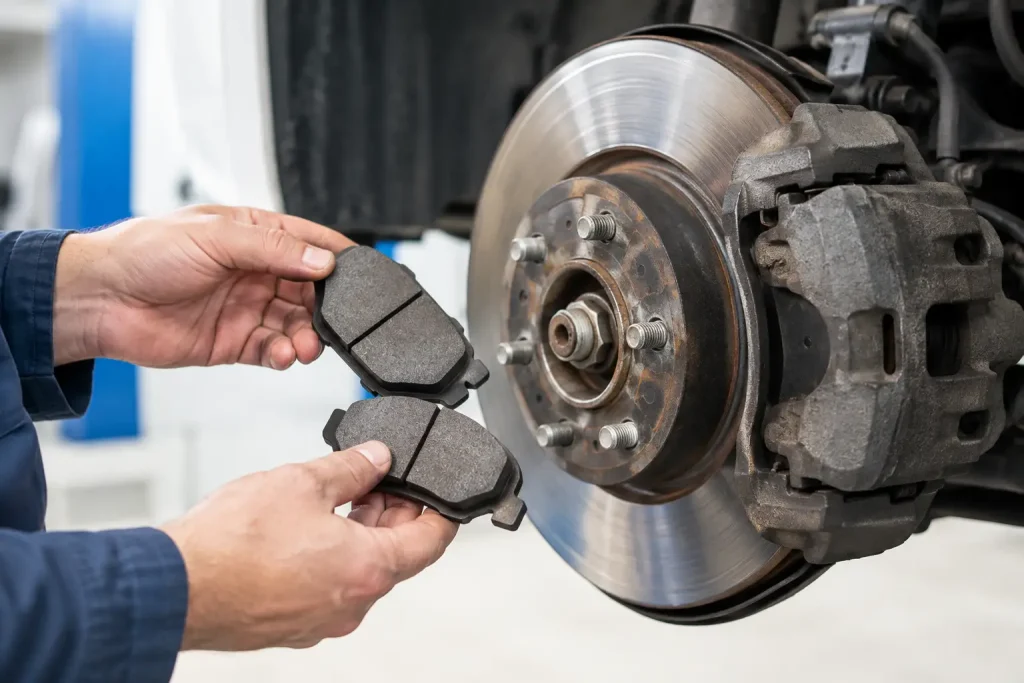
A faint squeal at low speed, a brake pedal that feels different, or a warning light on the dashboard can turn a routine drive into a concern. Knowing how to inspect brake pads gives you a useful first look at one of your vehicle’s most critical safety systems. It will not replace a proper brake inspection, but it can help you spot wear early and make a confident decision about booking service.
Brake pads are designed to wear down gradually. The rate depends on your vehicle, driving habits, traffic conditions, pad material, and the condition of the brake rotors and calipers. Dubai stop-and-go traffic, high temperatures, and frequent short trips can all add to brake wear, particularly on heavier German and American vehicles.
What You Need Before You Inspect Brake Pads
Start with a cool vehicle parked on level ground. Do not inspect brakes immediately after driving, as the wheels, rotors, and calipers can be extremely hot. Apply the parking brake, place an automatic transmission in Park or a manual transmission in gear, and use wheel chocks if you are lifting the vehicle.
For a basic visual check, a flashlight and a phone camera are often enough. To inspect more closely, you will need a jack, jack stands rated for your vehicle’s weight, a lug wrench, and a ruler or brake pad thickness gauge. Never rely on a jack alone while working around or under a vehicle. If you are not comfortable removing a wheel safely, a workshop inspection is the better option.
How to Inspect Brake Pads Through the Wheel
Many alloy wheels have openings wide enough to see the outer brake pad without taking the wheel off. Turn the steering wheel fully to one side when checking the front brakes. This may create a clearer view through the spokes.
Use your flashlight to locate the brake caliper. It sits over the edge of the metal brake rotor, also called the disc. The brake pad is the friction material between the caliper and rotor. You are looking at the pad’s material, not the metal backing plate behind it.
A healthy pad usually has more than 4 millimeters of friction material remaining. At around 3 millimeters, plan brake service soon. At 2 millimeters or less, the pads should be replaced promptly. Waiting longer increases the risk of metal-on-metal contact, which can damage the rotor and turn a straightforward pad replacement into a more expensive brake repair.
This view has limits. You may only see the outer pad, while the inner pad can wear faster due to a sticking caliper slide or piston. A visual check through the wheel is useful, but it does not confirm that both pads on an axle are wearing evenly.
Remove the Wheel for a Better Inspection
If you have the equipment and experience, removing the wheel provides a much more accurate look. Loosen the lug nuts slightly while the vehicle is on the ground. Lift the vehicle at the manufacturer-approved jacking point, support it securely on a jack stand, then remove the wheel.
With the wheel off, inspect the outer and inner pads. Measure the friction material at its thinnest point. Check both sides of the vehicle as well. Brake pads on the same axle should generally wear at a similar rate. Small differences are normal, but a major difference calls for further diagnosis.
Look beyond pad thickness. The following signs often point to an issue that new pads alone will not solve:
- One pad is much thinner than the other, which can indicate a seized caliper piston or sticking guide pins.
- The pad surface is cracked, crumbling, glazed, or contaminated with oil or brake fluid.
- The rotor has deep grooves, blue heat marks, a heavy outer lip, or visible cracks.
- Hardware is corroded, loose, damaged, or missing.
- The caliper boot is torn or there are signs of fluid leakage around the caliper.
A brake system works as a set of connected parts. Replacing pads without addressing a binding caliper, worn rotor, or contaminated surface can lead to noise, vibration, poor braking performance, and uneven wear soon afterward.
Check the Brake Rotor at the Same Time
The rotor should have a reasonably smooth, even surface. Light circular marks are normal. Deep scoring that catches a fingernail is not. Neither is a pronounced ridge around the outer edge, although a slight lip can develop with normal wear.
Rotors also have a minimum thickness specification. A professional measures this with a micrometer and compares it with the specification stamped on the rotor or listed by the manufacturer. Do not judge rotor condition by appearance alone. A rotor may look acceptable but still be below its safe service limit or warped from excess heat.
Warning Signs You Should Not Ignore
Your car may tell you about brake wear before a visual inspection does. A high-pitched squeal can come from a built-in wear indicator that contacts the rotor when the pad is low. However, dust, moisture, and certain pad compounds can also cause occasional noise, so squealing does not automatically mean the pads are finished.
Grinding is more urgent. It can mean the friction material has worn away and metal is contacting the rotor. Stop driving unless necessary and have the brakes checked as soon as possible. Continuing to drive can compromise braking performance and cause avoidable damage.
Other reasons to schedule a brake inspection include a steering wheel shake when braking, a vehicle that pulls to one side, a soft or unusually hard brake pedal, reduced stopping confidence, or a brake warning light. These symptoms may involve pads, rotors, calipers, brake fluid, suspension components, or an electronic braking system. They need diagnosis rather than guesswork.
Why Brake Pad Wear Is Not Always Even
Front brake pads often wear faster because the front axle handles more weight transfer during braking. On some vehicles, however, rear pads can wear surprisingly quickly because of electronic parking brake systems, brake-based stability control, or driving patterns.
Uneven wear is where a simple pad check becomes valuable. An inner pad worn much more than the outer pad may point to seized caliper hardware. Pads that are tapered or worn at an angle may not be moving freely in their mounting bracket. Premature wear on both sides can result from aggressive driving, heavy loads, frequent city braking, or pads that are not suited to the vehicle.
For vehicles with electronic parking brakes, do not attempt to force the rear caliper piston back during a pad replacement. Many systems require a service mode through a diagnostic tool. Handling it incorrectly can damage the caliper or trigger dashboard warnings.
When a Professional Brake Inspection Makes More Sense
A home check is sensible for an owner who wants to monitor wear, but it cannot assess every part of the system. A professional inspection includes inner and outer pad measurements, rotor thickness and runout checks, caliper operation, brake hose condition, fluid condition, hardware inspection, and a road test when appropriate.
This is especially worthwhile if your vehicle has a brake warning light, electronic parking brake, ABS message, brake vibration, or uneven pad wear. Modern vehicles can have sensor-equipped pads and brake service procedures that vary significantly by make and model. German and American vehicles in particular may require model-specific parts, scan-tool functions, and reset procedures after service.
At HYATTS AUTO CARE, a brake concern should be explained clearly: what is worn, what is still serviceable, what needs attention now, and what can reasonably wait. That approach helps you avoid both unnecessary replacement and the cost of letting a small brake issue develop into a larger one.
How Often Should You Check Your Brake Pads?
Check visible brake pad thickness during regular tire rotations or every 6,000 to 10,000 miles. If you drive mainly in city traffic, carry heavy loads, tow, or notice any change in braking behavior, check sooner. There is no universal replacement interval. Some pads last 25,000 miles, while others can exceed 60,000 miles depending on the vehicle and conditions.
The safest habit is simple: pay attention to changes. Brakes rarely fail without giving some warning, whether it is a noise, vibration, dashboard message, or a gradual change in pedal feel. Catching that warning early protects your rotors, your budget, and the people traveling with you.